To develop with Netbeans, of course you need the Netbeans IDE.
I suggest downloading the latest version 8.0 from the official website and install it. Just make sure you take the "All" edition, which includes support for Java and HTML5.
When the IDE is installed, you should download and install the GWT plugin for netbeans. It can be downloaded directly from the netbenas plugins web page.
The plugin then requires the GWT environment. If not yet installed, download it from here (The GWT SDK is enough) and unpack it somewhere on your local disk.
After this your development environment is ready to start.
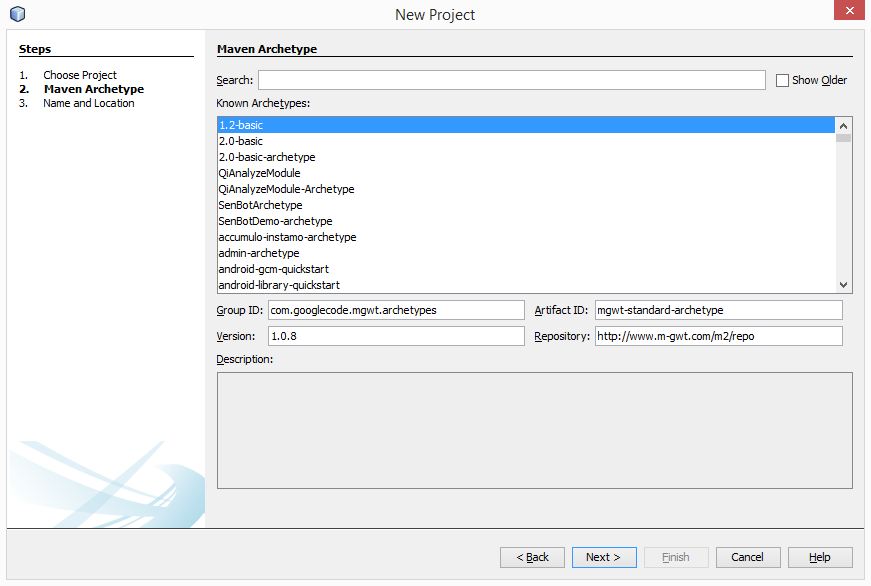
When netbeas is started you first create a new maven project target, select "Maven" and then "Project from Archtype"

Group-ID: com.googlecode.mgwt.archetypes
Artifact ID: mgwt-standard-archetype
Version: 1.0.8
Repository: http://www.m-gwt.com/m2/repo
Now you specify where to store your new project and your own "namespace", usually something like com.company and the project name.

After finishing you have the skeleton for the MGWT project ready. In the project name you see "Archtype generated mgwt app", with a right click on the project you can open the project dialog and put in a meaningfull project name.

So you are now ready to run the project.
Just right click on the project and select "Run"

It now asks you on which application server you with to run it, don't be worried, you won't need it for the final deployment. But for development purposes your code needs to be accessible via a http connection. So just select one of the installed application servers. (When you select "Remember Permanently" it won't aks you over and over again)

Netbeans now invokes the GWT compiler and trys to build your web application.
Unfortunaly the build will fail, complaining about a missing clientcode.xml
------------------------------------------------------------------------
BUILD FAILURE
------------------------------------------------------------------------
------------------------------------------------------------------------
Failed to execute goal org.apache.maven.plugins:maven-assembly-plugin:2.2-beta-5:single (assemble) on project mgwt1: Error reading assemblies: Error locating assembly descriptor: src/main/assembly/clientcode.xml
[1] [INFO] Searching for file location: C:\Develop\Sourceforge\mgwt1\src\main\assembly\clientcode.xml
[2] [INFO] File: C:\Develop\Sourceforge\mgwt1\src\main\assembly\clientcode.xml does not exist.
The clientcode.xml contains some informations on what should be packaged for the final app.
Just create the clientcode.xml in the folder src/main/assembly with this content:
<assembly>
<id>clientcode</id>
<includeBaseDirectory>false</includeBaseDirectory>
<formats>
<format>zip</format>
</formats>
<fileSets>
<fileSet>
<directory>target/${project.artifactId}-${project.version}</directory>
<includes>
<include>**/*.js</include>
<include>**/*.png</include>
<include>**/*.rpc</include>
<include>**/*.html</include>
<include>**/*.gif</include>
</includes>
<outputDirectory></outputDirectory>
</fileSet>
</fileSets>
</assembly>
Now you can run the project once more, and if your default browser is a webkit based browser you will see the screen similar to this:

If you instead receive a error message like :
ERROR: Possible problem with your *.gwt.xml module file.
The compile time user.agent value (safari) does not match the runtime user.agent value (gecko1_8). Expect more errors
then you have started your web app in another browser which is not based on webkit.
If you wish to continue using your belowed browser, then just change the compile option in the <project>.gwt.xml file. Just remove the line <set-property name="user.agent" value="safari" /> and re run your project.

This is the first step in building a GWT based mobile app with netbeans.
In the second step we will change the content of the start screen, you we see our belowed "Hello World" text.
No comments:
Post a Comment